Eyeliner is a transformative tool, capable of instantly defining and enhancing your eyes, whether you're a novice or a seasoned makeup enthusiast. From subtle everyday definition to dramatic evening glamour, the right eyeliner technique can truly elevate your look. This comprehensive guide unravels the art of eyeliner, ensuring you can achieve any desired effect. We'll explore diverse types of eyeliners, detailing their unique uses, and provide step-by-step techniques tailored for every eye shape, helping you answer the perennial question: "where do you put eyeliner?"
Understanding the Types of Eyeliners
The world of eyeliner is vast, offering a variety of formulas and applicators. Choosing the right type is the first step to mastering your eye makeup.
Pencil Eyeliner:
Description: The most common and user-friendly type, available in traditional sharpenable pencils or retractable twist-up versions.
Pros: Easy to control, great for beginners, excellent for smudged or smoky effects. Offers a softer line.
Cons: Can sometimes tug on the eyelid; may not offer the sharpest line.
When to Use: Ideal for everyday definition, creating a subtle lash line, or for a smudged, smoky eye. Perfect for beginners learning how to apply eyeliner.
Product Spotlight: Many brands offer excellent pencil liners. For a rich, intense black, consider the Lakmé Eyeconic Kajal, which offers a smooth glide and long-lasting wear, perfect for both the waterline and lash line.
Gel Eyeliner:
Description: Typically comes in a pot and is applied with a separate brush (usually an angled or fine-tipped brush).
Pros: Intense colour payoff, long-wearing, smudge-proof once set, offers good precision.
Cons: Requires a steady hand and a separate brush; can dry out in the pot if not sealed properly.
When to Use: Great for creating sharp lines, winged eyeliner, or intense definition. A good step up for those who have mastered pencil liners.
Liquid Eyeliner:
Description: Available in a pot with a dip brush or as a pen-style felt-tip applicator.
Pros: Delivers the sharpest, most precise, and often most opaque line. Excellent for bold looks and intricate wings.
Cons: Can be challenging for beginners to control; mistakes are more noticeable.
When to Use: Best for dramatic looks, crisp winged eyeliner, and creating a defined, striking eye.
Felt-Tip Eyeliner Pen:
Description: A liquid eyeliner contained in a pen format with a felt tip.
Pros: Combines the precision of liquid eyeliner with the ease of a marker. Excellent control, especially for beginners learning how to do winged eyeliner.
Cons: Tips can sometimes dry out; may not offer the same intensity as pot liquid liners.
When to Use: Ideal for beginners and those who want the precision of liquid eyeliner without the mess or steep learning curve.
Powder Eyeliner (Eyeshadow):
Description: Simply using a dark eyeshadow (black, brown, navy) applied with a damp angled brush.
Pros: Very soft and natural look, easy to blend, versatile.
Cons: Not as long-wearing as other types; can smudge easily.
When to Use: For a very subtle, natural everyday look, or to soften a harsher pencil line.
Kohl Eyeliner:
Description: Traditionally a soft, dark pencil designed for use on the waterline and tightlining. Often made with a softer, waxier texture
Pros: Intense pigment, glides smoothly on the waterline, creates a smouldering look. The Lakmé 9 to 5 Eyeconic Kajal is a popular example of a kohl liner
Cons: Can smudge more easily than other types; not ideal for sharp, precise lines on the lash line.
When to Use: Perfect for tightlining, lining the waterline, and creating a dramatic, sultry eye look.
How to Apply Eyeliner Like a Pro
Step 1: Prep Your Eyes
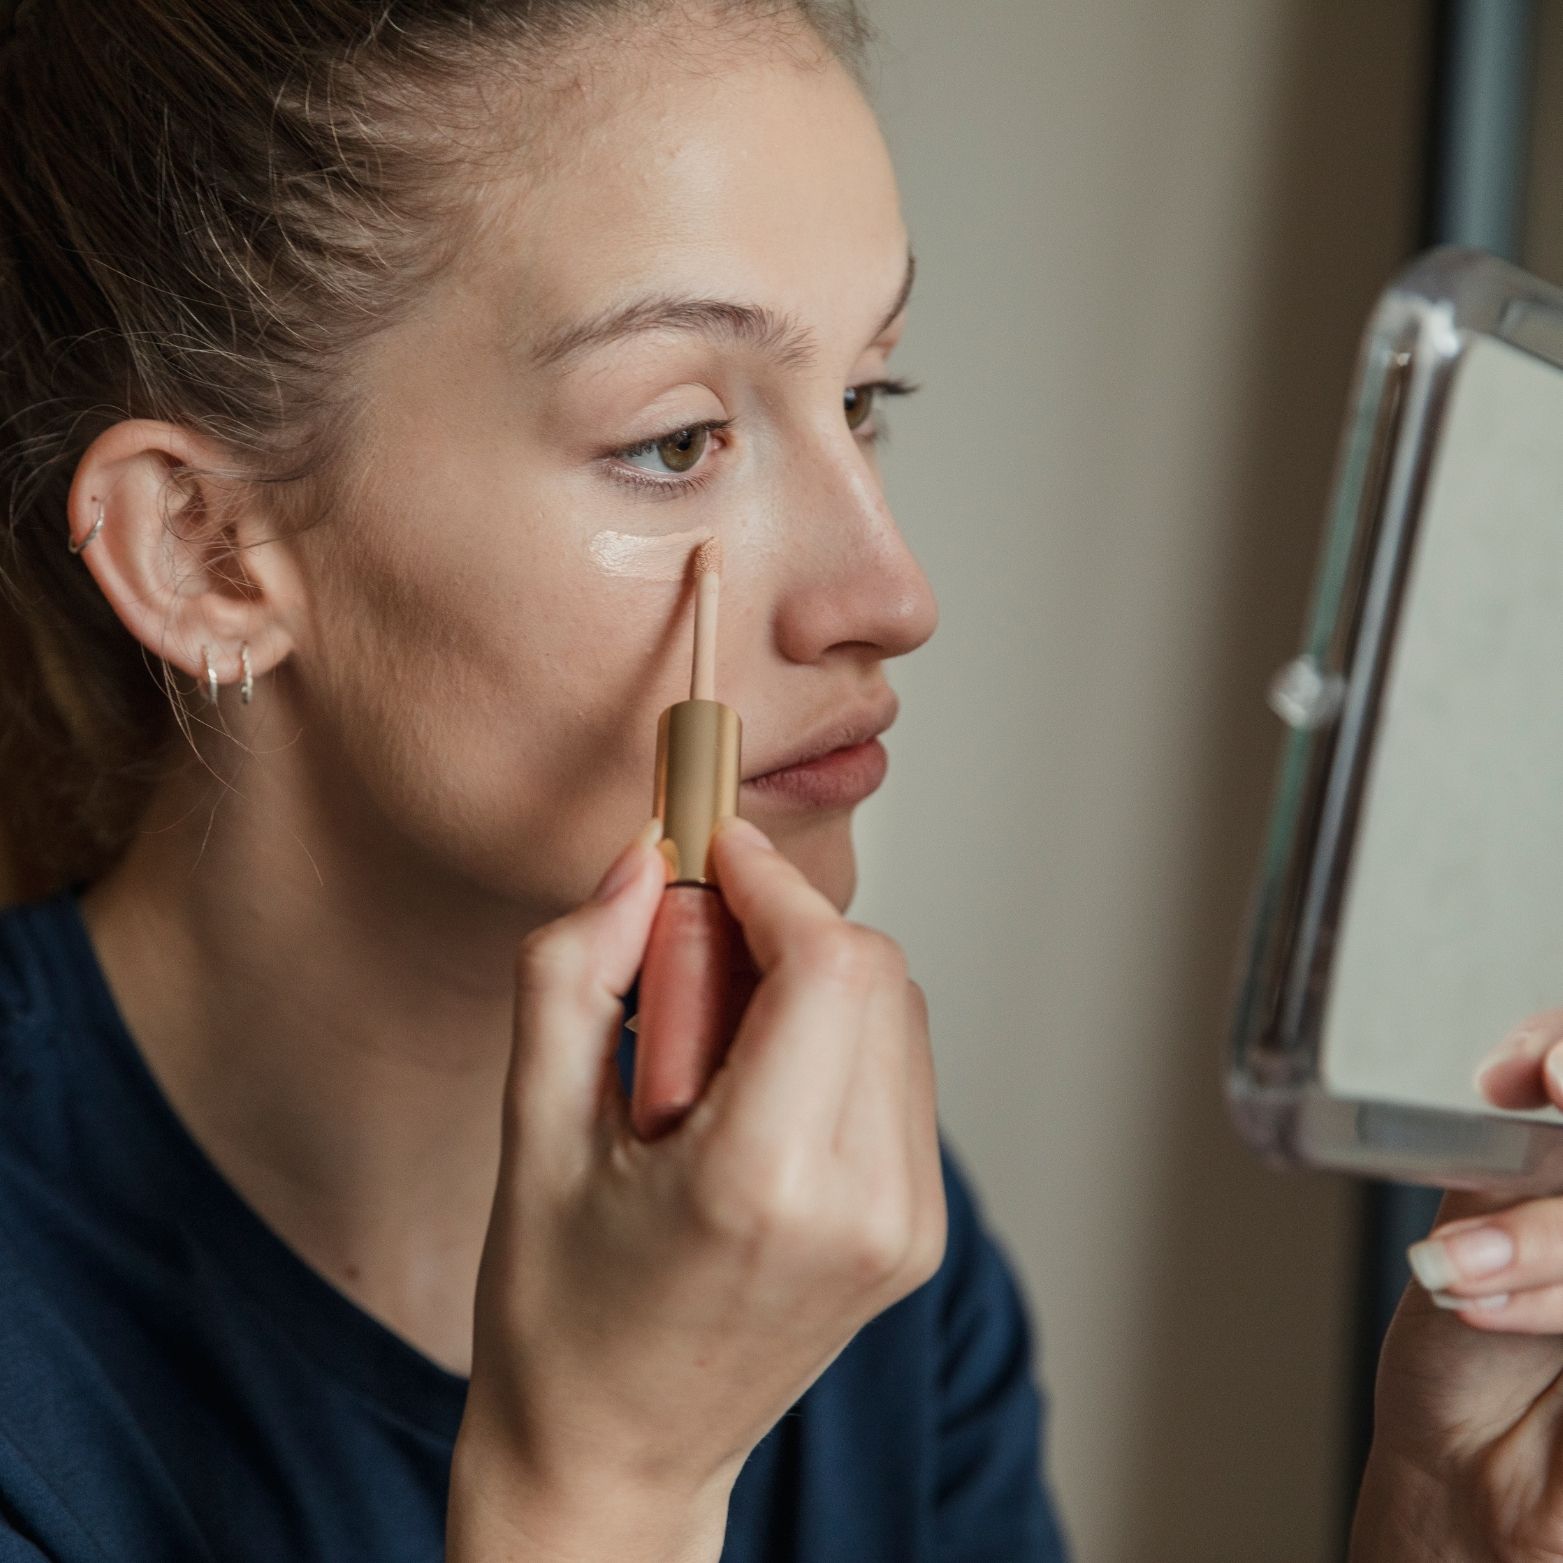
Always begin with a clean, well-moisturised eyelid. Apply an eye primer or a thin layer of concealer to create a smooth base—this helps the eyeliner last longer and prevents creasing or smudging.
Step 2: Pick the Right Eyeliner
Choose your eyeliner based on the look you want:
Pencil for a soft, everyday definition
Liquid for sharp, dramatic lines and wings
Gel for a balance of precision and lasting power
Step 3: Line from the Inner Corner
Start at the inner corner of your upper lash line and work your way out using small, steady strokes. This technique gives you more control and helps avoid a shaky or uneven finish. A precise applicator like the Lakmé 9 To 5 Eyeconic Liquid Eyeliner makes this process smoother, especially for beginners aiming for a clean, defined look.
Step 4: Tightline for a Natural Boost
To make lashes look thicker without obvious liner, gently lift your eyelid and apply eyeliner to your upper waterline. This adds subtle depth and definition to your eyes.
Step 5: Add a Wing (Optional)
If you want to go bold, flick the liner upward and outward from the outer corner of your eye. Use a piece of tape or the edge of a spoon as a guide to get a clean, even wing.
Step 6: Clean Up and Refine
Fix any slips or smudges using a cotton swab dipped in micellar water or makeup remover. You can also sharpen edges for a more polished finish.
Before you start, ensure your eyelids are clean and primed to help your eyeliner last longer. Knowing how to use eyeliner properly is key to achieving a flawless look that stays put throughout the day. Proper prep creates a smooth canvas, making application easier and preventing smudging.
1. Classic Lash Line Definition (Beginner-Friendly)
Best for: Everyday wear, subtle enhancement, all eye shapes.
Technique:
Choose a pencil or felt-tip eyeliner.
Start from the inner corner of your upper lash line.
Draw small, connected dashes or dots along your lash line, getting as close to the roots of your lashes as possible.
Connect the dots/dashes into a continuous line, gradually thickening it as you move towards the outer corner.
For a softer look, gently smudge the line with a brush or cotton bud.
2. Tightlining (Invisible Eyeliner)
Best for: Making lashes appear fuller without visible eyeliner, natural looks, anyone.
Technique:
Use a waterproof pencil or kohl liner (like the Lakmé Eyeconic Kajal).
Gently lift your upper eyelid.
Apply the eyeliner to your upper waterline – the inner rim of your eyelid, just below your lashes. Wiggle the pencil between the roots of your lashes.
This technique fills in any gaps and makes your lash line appear denser.
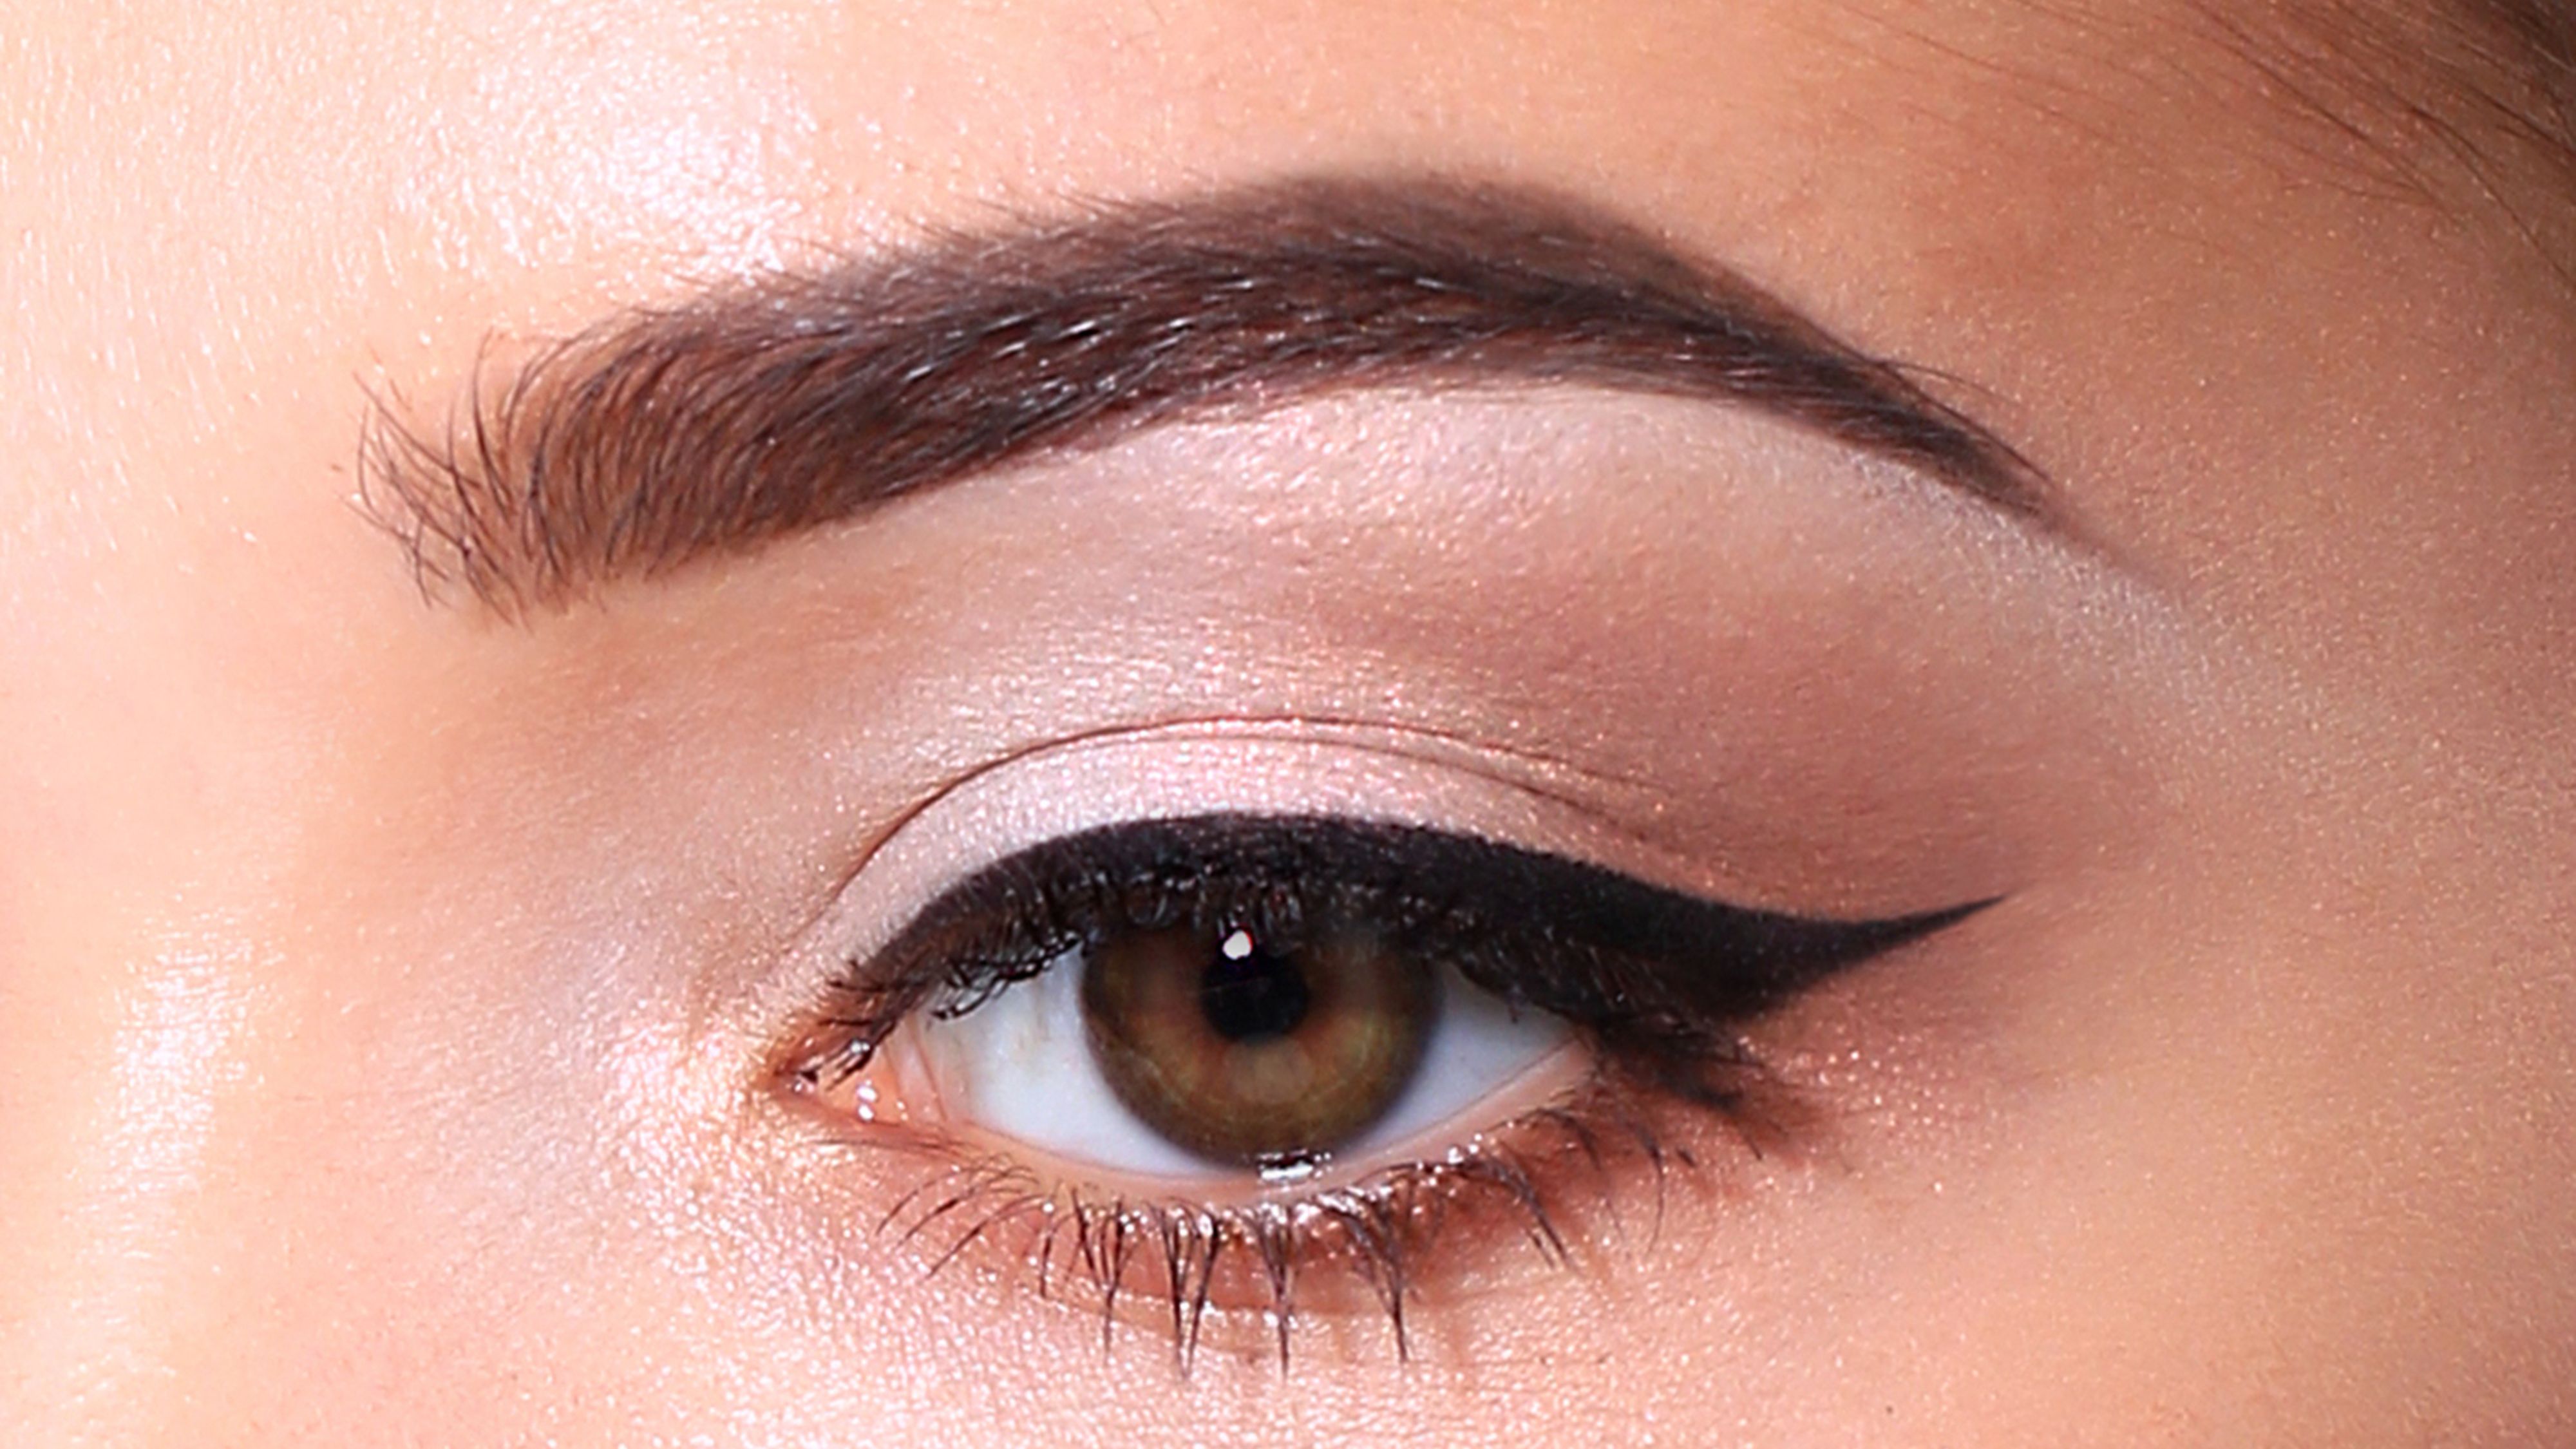
3. How Do You Do Winged Eyeliner (The Classic Wing)
Best for: dding drama and lift, most eye shapes (with adaptations). Liquid or felt-tip liners work best.
Technique:
Start with a classic lash line (step 1).
Map your wing: If you ever wonder—how do you do winged eyeliner, we have got you covered. Look straight ahead. Use a small dot or a tiny mark to indicate where you want the tip of your wing to end, aiming towards the tail of your eyebrow.
Draw the lower line of the wing: From the outer corner of your lower lash line (where your top and bottom lashes meet), draw a thin, straight line upwards, connecting to the dot you marked.
Create the triangle: From the tip of your wing, draw a line back towards the middle of your upper lash line, forming a triangle.
Fill it in: Carefully fill in the outline you've created.
Refine: Clean up any wobbles with a cotton bud dipped in micellar water or makeup remover.
4. Lower Lash Line Application
Best for: Adding intensity, balancing the eye, smoky looks.
Technique:
Use a pencil or kohl liner.
Apply to the outer two-thirds of your lower lash line for a softer look, or the entire line for more intensity.
For a smoky effect, gently smudge the line with a small brush or cotton bud.
For the waterline (the inner rim of the lower eyelid), use a kohl or waterproof pencil like Lakmé Eyeconic Kajal for definition.
Where Do You Put Eyeliner: Tips for All Eye Shapes
Eyeliner placement can dramatically change how your eyes appear. Here’s how to tailor your technique:
Almond Eyes:
Line the upper lash line with a slight wing to accentuate your natural eye shape.
Apply liner to the upper waterline (tightline) for subtle depth and fuller lashes.
Gently smudge the lower lash line for a soft, balanced effect.
Highlight the inner corners of your eyes to brighten and open up your gaze.
This shape is super versatile, so feel free to experiment with different styles and intensities!
A classic winged liner enhances their natural lift. Tightlining can make them pop.
Hooded Eyes:
The crease partially covers the eyelid, causing eyeliner to disappear when eyes are open.
Apply a thinner line at the inner corner, gradually thickening it toward the outer corner.
When creating a wing, extend it more outward than upward to ensure visibility.
Use tightlining to add definition without occupying lid space.
Monolid Eyes:
Lack of a visible crease results in a flatter eyelid.
A thicker eyeliner line works well since it won’t get hidden in a crease.
Try a "wedge" wing—a thicker, triangular wing that widens gradually from the inner corner outward.
Use liquid or felt-tip liners for precise application.
Round Eyes:
Eyes appear more open and circular.
Extend the eyeliner outward at the outer corner to elongate the eye.
Create a longer, horizontal wing for an almond-shaped effect.
Avoid heavy lining of the entire lower lash line and waterline to prevent making eyes look rounder.
Close-Set Eyes:
Eyes are closer Eyes are closer together than the width of one eye.
Focus eyeliner on the outer half of the lash line.
Extend the wing outward to create the illusion of wider-set eyes.
Keep the inner corners lighter or leave them unlined to avoid emphasizing closeness.
Wide-Set Eyes:
Extend the eyeliner gently into the inner corners to visually bring the eyes closer together.
Line the entire upper and lower lash lines for balanced coverage.
Keep outer wings short and subtle to avoid making eyes appear wider apart.
Use darker eyeliner shades near the inner lash line to enhance closeness.
Tightline both upper and lower waterlines for extra definition.
further apart than the width of one eye.
Pro Tips for a Flawless Application
Steady Hands: Rest your elbow on a table and use your pinky finger to anchor your hand on your cheek.
Small Steps: Instead of drawing one long line, use small, connected strokes or dots.
Cotton Bud Fixes: Keep cotton buds and micellar water or makeup remover handy for quick clean-ups and sharpening lines.
Layering: For more intensity, apply a pencil liner first, then go over it with liquid or gel.
Warm up Pencils: If a pencil is too hard, warm the tip between your fingers for a few seconds to make it glide smoother.
Look Down, Not Up: When applying to the upper lash line, gently look down into a mirror, keeping your eyelid taut.
Common Eyeliner Mistakes to Avoid
Drawing a thick line at the inner corner: This can make eyes look smaller and closer together.
Not getting close enough to the lash line: Leaves a gap between your liner and lashes, which looks unnatural.
Uneven wings: Practice is key! Use the "dot and connect" method or tape for symmetry.
Tugging on the eyelid too hard: Can lead to shaky lines and premature wrinkles. A gentle stretch is enough.
Using non-waterproof liner on the waterline: It will smudge and disappear quickly. The Lakmé Eyeconic Kajal is a great waterproof option for the waterline.
How to Remove Eyeliner Effectively
Proper removal is crucial to prevent irritation, eye infections, and damage to your delicate eye area.
Use a dedicated eye makeup remover: Choose a bi-phase (oil and water) formula for waterproof and long-wearing liners, or micellar water for lighter formulas.
Soak a cotton pad: Saturate a cotton pad with remover.
Press and hold: Gently press the soaked pad over your closed eyelid for 10-15 seconds. This allows the remover to break down the makeup.
Wipe gently: Without rubbing, gently wipe downwards and outwards. Repeat until all traces of eyeliner are gone.
Avoid harsh rubbing: The skin around your eyes is thin and delicate. Rubbing can cause irritation and wrinkles.
Cleanse: Follow up with your regular facial cleanser to remove any residue.
Mastering eyeliner takes practice, but with these techniques and tips, you're well on your way to perfecting your gaze. Experiment with different types and styles to discover what best enhances your unique eye shape and personal aesthetic.
FAQs about Eyeliner
Q1: What's the best eyeliner for beginners?
A1: Felt-tip pen liners or soft pencil eyeliners are generally the easiest to control for beginners.
Q2: My eyeliner smudges throughout the day. What can I do?
A2: Ensure your eyelids are clean and primed before application. Use a waterproof or long-wearing formula. You can also lightly set your liquid or gel liner with a matching eyeshadow using a small brush.
Q3: Can I use eyeliner on my waterline?
A3: Yes, but use a kohl or waterproof pencil specifically designed for this area, like the Lakmé Eyeconic Kajal. Avoid liquid or gel liners on the waterline.
Q4: How do I make my winged eyeliner symmetrical?
A4: Practice is key! Use the "dot and connect" method, drawing the outline first. Some people find beauty hacks like using a small piece of tape as a guide helpful. Always do one eye, then immediately match the other.
Q5: What's the difference between eyeliner and kajal?
A5: While often used interchangeably, "kajal" traditionally refers to a very soft, intensely dark kohl formulation often used on the waterline and lash line for a deep, smudgy effect. Eyeliner is a broader term encompassing various formulas (liquid, gel, pencil) designed for lash line definition, wings, and more precise looks. Products like Lakmé Eyeconic Kajal bridge this, offering the intensity of traditional kajal with the precision and long-wear of modern liners.
Sophin C. is a fashion and lifestyle writer whose work has appeared in The Times of India, Voice of Fashion, Outlook Luxe, and DominAsian, a London based magazine. She brings a keen eye for style and culture to her writing, exploring the intersections of fashion with contemporary trends.
We know that you care about your personal data and how it is used, and we want you to
trust that Unilever uses your personal data carefully. This Privacy
Notice
will help you understand what personal data we collect, why we collect it and what we do
with it.
As you read our Notice, please keep in mind that it applies to all Hindustan
Unilever
Limited.
Please take a moment to familiarise yourself with our privacy practices and let us know
if
you have any questions by sending us an email to Customer Care or
submitting a request through the “Contact
Us” form on our websites.
We have tried to keep this Notice as simple as possible, but if you’re not familiar with
terms, such as cookies, IP addresses, and browsers, then please read about these key terms first.
You have the right to object to certain uses of your personal data
including
the use of your personal data for direct marketing. See what your rights are and how you
can
exercise them here.
Any personal data provided to or collected by Unilever is controlled by
Hindustan Unilever Limited, the data
controller.
This Privacy Notice applies to personal data collected by Unilever in
connection with the services and products we offer. References to
“Unilever”
in this Notice means Hindustan Unilever Limited and any
company directly or indirectly owned and/or controlled by
Hindustan
Unilever Limited that you are interacting with or have a
business relationship with.
This Privacy Notice also applies to Unilever’s marketing content,
including
offers and advertisements for Unilever products and services, which we
(or a
service provider acting on our behalf) send to you on
third-party websites, platforms and applications based
on
your site usage information. These third-party websites generally have
their
own Privacy Notice and Terms and Conditions. We encourage you to read
them
before using those websites.
Personal data means
any
information that can be used to identify directly or indirectly a
specific individual.
You are not required to provide Unilever the personal
data
that we request, but if you choose not to do so, we may not be able to
provide you with our products or services, or with a high quality of
service
or respond to any queries you may have.
We may collect personal data from a variety of sources.
This
includes:
Personal data you give us directly,
Personal data we collect automatically, and
Personal data we collect from other sources.
Personal data means any information that can be used to
identify directly or indirectly a specific individual. This definition
includes personal data collected offline through our Consumer Engagement
Centres, direct marketing campaigns, sweepstakes and competitions and
online
through our websites, applications and branded pages on third-party
platforms and applications accessed or used through third-party
platforms.
You may be asked to provide your personal data when you are in contact
with
us. Hindustan Unilever Limited companies may
share your personal data with each other and other Unilever
Group companies and use it in a manner consistent with this Privacy
Notice.
We may also combine it with other information to
improve
our products, services, content, and advertising.
You are not required
to
provide Unilever the personal data that we request, but if you
choose
not to do so, we may not be able to provide you with our products or
services, or with a high quality of service or respond to any
queries
you may have.
Ways in which we collect your personal data
We may collect personal data from a variety of sources.
This
includes:
Personal data you give us directly. We collect data
about how you use our services and products, such as the types of
content you view or engage with, or the frequency and duration of
your
activities. We also collect personal data you provide us when you
sign
up for a marketing newsletter, complete a survey or register for an
account to buy our products. In so doing, we may ask for personal
data,
such as your name, gender, date of birth, address, email address,
telephone number or credit card details. Some Unilever brands may
collect “special categories of personal data” about
you
with your explicit consent. For more information on the special
categories of data we collect and how we use it, please refer to the
relevant section below.
Personal data we collect automatically. We also
receive
and store certain types of personal data whenever you interact with
us
online. For example, we use cookies and tracking technologies (to
find
out more, see our privacy key
terms) to obtain personal data when your web browser
accesses
our websites or advertisements and other content served by or on
behalf
of Unilever on other websites. Your personal data is also collected
when
you search, buy, post, participate in a contest or questionnaire or
communicate with our customer service teams. Examples of the types
of
personal data we collect include; IP address (to find out more see
our
privacy key
terms), device ID,
location data, computer and connection information such as browser
type
and version, time zone setting, browser plug-in types and versions,
operating system, and purchase history – which Unilever sometimes
aggregates with similar information from other
consumers. During some of your internet browsing on Unilever’s
websites
we may also use software tools to measure and collect session
information, including page response times, download errors, length
of
visits to certain pages, page interaction information, and methods
used
to browse away from the page. We may also collect technical
information
to help us identify your device for fraud prevention and diagnostic
purposes.
Personal data we collect from other sources. We
collect
personal data from other sources including our trusted partnerships
with
third-parties and where we operate Unilever accounts on third-party
platforms: For example, when you use the “like” functionality on
Facebook or the +1 functionality on Google+. Additionally, we
receive
information about you and other visitors’ interactions with our
advertising to measure whether our advertising is relevant and
successful. We also collect information about you and your
activities
from a third-party when we jointly offer services or products, or
from
third-party data enrichment providers (to find out more see our
privacy
key
terms) who may deliver
insights to Unilever about the personal data we hold.
When and why we collect “special categories of personal data”
Certain categories of personal data, such as health data, financial data,
biometrics, race, ethnicity, religion, health, sexuality or biometric
data
are classified as “special categories of data” or
“Sensitive Personal Information” and benefit from additional
protection.
We limit the circumstances where we collect and process
these special categories of data.
Unilever sometimes collects data related to your health such as
allergies,
pregnancy or skin type to send you tailored ads and relevant promotions.
Unilever only collects and uses this personal data where you have
provided
us with your consent for us to do so. In some instances, you may have
requested services or products that do not directly involve the
collection
of any special categories of data, but may imply or suggest your
religion,
health or other special categories of data.
To illustrate circumstances where Unilever collects and processes special
categories of data we have provided the following examples:
Unilever collects expectant mothers’ due dates in
its
Zwitsal or Baby Dove newsletter sign-up page. It may also place
cookies
on the sign-up page which capture this information too. This data is
then used to create an audience of expectant mothers to receive
online
advertising from relevant Unilever brands. For more information on
Unilever’s profiling activities, please refer to the relevant
section;
Similarly, Unilever collects personal data related to
consumers’
allergies to provide consumers with ads and promotions
for
products which are relevant to their needs.
How do we protect children’s privacy?
We understand the importance of taking extra precautions
to
protect the privacy and safety of children using Unilever products and
services.
Most of Unilever’s websites are designed and intended for use by
adults. Where one of our websites is intended for use by a
younger audience, we will obtain consent from the person with
parental responsibility before we collect personal data
where it is required by applicable laws and regulations (the age at
which
consent is necessary varies from Country to Country).
If you are a child under the age where parental consent is required in
your
Country, you should review the terms of this Privacy Notice with your
parent or guardian to make sure you
understand and accept them. If we discover that we have collected
personal
data from a child without consent from a parent or guardian where such
consent should have been obtained, we will delete that
personal data as soon as practical. Access to certain parts of the
Unilever’s websites and/or eligibility to receive prizes, samples or
other
rewards are generally limited to users over a certain age.
We sometimes use your personal data to carry out age
verification checks and enforce any such age restrictions.
We collect, process and
disclose your personal data only for specific and
limited
purposes. For example, to process your
payments, to assess and handle any
complaints,
to develop and improve our products, services,
communication methods and the functionality of our websites, to provide
personalised products, communications and targeted
advertising as well as product recommendations to you.
We also create profiles by analysing the information about your online
surfing, searching and buying behaviour and your interactions with our
brand
communications by building segments (creating groups that have certain
common characteristics) and by placing your personal data in one or more
segments.
Additionally, Unilever processes your personal data also using
automated means. An automated decision is a decision
which
is made solely by automatic means, where no humans are
involved in the decision-making process related to your personal data.
We collect, process and
disclose your personal data for the following
purposes:
To process your payments, if you purchase our
products,
to provide you with your order status, deal with
your
enquiries and requests, and assess and handle any
complaints;
To process and answer your inquiries or to contact
you
to answer your questions and/or requests;
To develop and improve our products, services,
communication methods and the functionality of our websites;
For the purposes of competitions or
promotions that you have entered;
To communicate information to you and to manage
your
registration and/or subscription
to
our newsletter or other communications;
To manage our everyday business needs regarding
your
participation in our contests, sweepstakes or promotional activities
or
request;
To authenticate the identity of individuals
contacting
us by telephone, electronic means or otherwise;
For internal training and quality
assurance purposes;
To understand and assess the interests,
wants, and changing needs of
consumers, to improve our website, our current products and
services,
and/or developing new products and services; and
To provide personalised products, communications
and
targeted advertising as well as product recommendations to you.
When we collect and use your personal data for purposes mentioned above
or
for other purposes, we will inform you before or at the
time of collection.
Where appropriate, we will ask for your consent to
process
the personal data. Where you have given consent for processing
activities,
you have the right to withdraw your consent at any
time.
In some cases, we rely on legitimate interest for
processing
your personal data. A legitimate interest could exist for example, when
you
sign up for a loyalty scheme with one of our brands and we use the
personal
data collected to conduct data analytics to improve our products or
services. This ground will only be used where it is necessary to achieve
a
legitimate interest, for example to assist in the performance of a
contract,
or to optimise a service, and does not outweigh your rights as an
individual. This legal basis will only be relied upon where there is no
less
intrusive way to process your personal data. We can assure you that if
legitimate interest is used as a ground for processing your personal
data,
we will keep a record of this and you have the right to ask for this
information.
We process your personal data to perform a contract to
which
you are or will be a party. For example, we need to process your
personal
data to deliver a product or a service you bought, to allow you to take
part
in one of our competitions, or to send you samples that you have
requested.
We also process your personal data when we have a legal
obligation (e.g., tax or social security obligations) to
perform such processing. For example, a court order or a subpoena may
require us to process personal data for a particular purpose, or we may
be
compelled to process personal data to report suspicious transactions
under
the local anti-money laundering rules.
Profiling
Unilever uses your personal data to build profiles. We
create profiles by analysing the information about your online surfing,
searching and buying behaviour and your interactions with our brand
communications by building segments (creating groups that have certain
common characteristics) and by placing your personal data in one or more
segments. These segments are used by Unilever to
personalise the website and our communications to you
(such
as showing relevant content to you when you visit our site or in a
newsletter to you), and to display relevant offers and advertisements
from
the Unilever brands on the Unilever sites, and via third-party websites.
The
segments can also be used for third-party campaigns on the Unilever
sites.
Unilever profiles your data where you have provided
consent
for us to do so; for example, accepting the setting of cookies on your
browser online or signing up for email newsletters from one of our
brands.
You can withdraw your consent to prevent your personal
data
being used this way at any time using the manage
cookies
section of our Cookie Notice or unsubscribing to the
use of
your email address if you have logged into one of our websites or signed
up
to any marketing newsletters.
By way of example –
Unilever collects data, with your consent, from:
Our websites about what you view and the way you
interact with our content;
Our digital display advertising that we
serve
to you on social platforms and other publisher’s websites;
and
Forms you fill in online and send to us
about
what your interests are.
We also track the products you buy when you click
on
one of our display adverts and go on to purchase something from a
selection of our retail partners.
If you have asked to receive emails or SMS
communications from us, we track whether you open, read
or
click on the content to see what you are interested in so that we
can
give you more content that we think you are more likely to enjoy.
We use this data to profile your likes and
dislikes. For instance, if we see that you
are
regularly viewing Vegan recipes on our “Recipedia” website, and you
have
opted in to receiving emails from us, we might give you an update on
the
new Vegan recipes that have just hit the site for your interest, or
we
may tailor our web content when you visit towards things we think
you’ll
be most interested in.
Based on this profile information, we may also give you advertising
that
we think you will like and want to
see
as you view content from us or from our network of publishers that
we
advertise with. Sometimes, with your consent, we may use your
current location to serve advertising to you that
is to
do with promotions or events that are happening nearby that we think
you
might be interested in.
We may also use information you have provided to selected
third-parties and consented to be
shared,
like your age, gender, life stage, lifestyle and wider interests to
identify people who we think will have similar interests to you and
who
we believe will be interested in similar advertising.
Automated decision-making
In some instances, Unilever processes your personal data using
automated means. An automated decision is a decision
which
is made solely by automatic means, where no humans are
involved in the decision-making process related to your personal data.
For
example:
Unilever uses game simulations of
science-based
behavioural assessments and data science
techniques to assess prospective employees. Candidates
are
required to play a set of games and the behavioural patterns
exhibited
during gameplay are assessed by a Unilever customised algorithm to
predict the candidate’s potential for a specific role. This
algorithm is
regularly tested to ensure it remains fair,
effective
and unbiased.
We will not make decisions based solely on automated decision making that
have significant impact on you. If we do so we notify you and provide
you
with clear information about our decision to rely on
automated processing to make our decision and our lawful basis for doing
so.
For example, Unilever processes your personal data using automated means
only if it is necessary for the entering into or the performance of a
contract with you, or when you have given your
explicit consent.
You have the right not to be subject to a decision which
is
based solely on automated processing and which produces legal or other
significant effects on you. In particular, you have the right:
to obtain human intervention;
to express your point of view;
to obtain an explanation of the decision reached
after
an assessment; and
to challenge such a decision.
As part of the Unilever Group, a global business, Hindustan Unilever
Limited shares your personal data within the Unilever
Group
and with selected third-parties in the following
circumstances:
Third-party service providers. In order to carry
out
your requests, respond to your inquiries, fulfil your orders, honour
coupons, provide you with samples, enable you to participate in
sweepstakes or make various other features, services and materials
available to you through our websites we share your personal data
with
third-party service providers that performfunctions on our behalf, such as companies that:
host
or operate Unilever’s websites, process payments, analyse data,
provide
customer service, postal or delivery services, and sponsors or other
third-parties that participate in or administer our promotions. They
have access to personal data needed to perform their functions but
may
not use it for other purposes. Further, they must process this
personal
data in accordance with this Privacy Notice and as permitted by
applicable data protection laws and regulations.
Other third-parties. Your personal data will also
be
used by us or shared with our sponsors, advertisers, advertising
networks, advertising servers, social media networks, and analytics
companies or other third-parties in connection with
marketing, promotional,
data
enrichment (to find out more about our privacy key
terms
follow the link)
and other
offers,
as well as product information.
Business transfers. Your personal data will be used
by
us or shared with the Unilever Group, primarily for business and
operational purposes. As Unilever Group continues to develop
the
business, it may sell or purchase assets, subsidiaries or business
units. In such transactions, your personal data generally is
one
of the transferred business assets but remains
subject to the promises made in any pre-existing
Privacy Notice (unless, of course, you consent otherwise). If
another
entity acquires us, our businesses or substantially all or part of
our
assets, or assets related to Unilever’s websites, your personal data
will be disclosed to such entity as part of the due
diligence
process and will be transferred to such entity as one
of
the transferred assets. Also, if any bankruptcy or
reorganization
proceeding is brought by or against us, all such personal data will
be
considered an asset of ours and as such it is possible they will be
sold
or transferred to third-parties.
Legal disclosure. We may transfer and disclose your
personal data to third-parties:
To comply with a legal obligation;
When we believe in good faith that an
applicable law requires it;
At the request of governmental authorities conducting an
investigation;
To verify or enforce our “Terms of Use” or
other applicable policies;
To detect and protect against fraud, or any
technical or security
vulnerabilities;
To respond to an emergency; or otherwise
To protect the rights,
property, safety, or
security of third-parties, visitors to
Unilever’s websites, Unilever or the public.
International data transfers
Unilever shares personal data within the Unilever Group or with
third-parties
for purposes described in this Privacy Notice.
Unilever will only send personal data collected within a
restricted
legal framework, such as e.g. the European Economic
Area (EEA) or Asian Pacific Economic Cooperation (APEC), to
countries which do not have data protection laws that are considered to
provide appropriate levels of protection in the restricted legal
framework
in circumstances such as:
· To follow your
instructions;
· To comply with a legal
duty; or
· To work with our agents and
advisers
who we use to help run our business and
services.
If we do transfer personal data to outside of the restricted legal
framework,
Unilever will make sure that it is protected in the same
way as if it was being used in that restricted legal
framework.
We’ll use one of the following safeguards:
· Transfer to another Country whose
privacy legislation ensures an adequate level of
protection
of personal data similar or equivalent to the country it was collected
in;
Put in place a contract with the third-party that
means
they must protect personal data to the same standards as in the
country
the data was collected in.
Unilever takes the security of your personal data very
seriously. We take every effort to protect your
personal
data from misuse, interference, loss, unauthorised access, modification
or
disclosure.
Our measures include implementing appropriate access
controls, investing in the latest Information
Security
Capabilities to protect the IT environments we leverage,
and
ensuring we encrypt, pseudonymise and
anonymise personal data wherever possible.
Access to your personal data is only permitted among our employees and
agents
on a need-to-know basis and subject to strict
contractual confidentiality obligations when processed
by
third-parties.
We will keep your personal data for as long as we need
it
for the purpose it is being processed for. For example,
where you make a purchase online with us we will keep the data related
to
your purchase, so we can perform the specific contract you have entered
and
after that, we will keep the personal data for a period which enables us
to
handle or respond to any complaints, queries or concerns relating to the
purchase.
Your data may also be retained so that we can continue to improve
your experience with us and to ensure that you receive any
loyalty rewards which are due to you.
We retain the identifiable data we collect directly for targeting
purposes
for as little time as possible, after which we employ
measures to permanently delete it.
We will actively review the personal data we hold and delete it
securely, or in some cases anonymise it,
when
there is no longer a legal, business or consumer need for it to be
retained.
Your rights in relation to your personal data how it is processed. You
can
exercise these rights at any point. We have provided an overview of
these
rights below together with what this entails for you. You can exercise
your
rights by sending an email or submitting a request through the “Contact
Us”
form on our websites.
Where we process your personal data, you have a number of rights over how
the
data is processed and can exercise these rights at any point. We have
provided an overview of these rights below together with what this
entails
for you. You can exercise your rights by sending an email or submitting a
request
through the “Contact Us” form on our websites.
The right to be informed. You have the right to be
provided with clear, transparent and easily understandable
information
about how we use your personal data and your rights. Therefore,
we’re
providing you with the information in this Notice.
The right to access and rectification. You have the
right to access, correct or update your personal data at any time.
We
understand the importance of this and should you want to exercise
your
rights, please contact us.
The right to data portability. The personal data
you
have provided us with may be portable. This means it can be moved,
copied or transmitted electronically under certain circumstances.
The right to be forgotten. Under certain
circumstances,
you have right to request that we delete your data. If you wish to
delete the personal data we hold about you, please let us know and
we
will take reasonable steps to respond to your request in accordance
with
legal requirements. If the personal data we collect is no longer
needed
for any purposes and we are not required by law to retain it, we
will do
what we can to delete, destroy or permanently de-identify it.
The right to restrict processing. Under certain
circumstances, you have the right to restrict the processing of your
personal data.
The right to object. Under certain circumstances,
you
have the right to object to certain types of processing, including
processing for direct marketing (i.e., receiving emails from us
notifying you or being contacted with varying potential
opportunities).
The right to lodge a complaint with a Supervisory Authority.
You have the right to lodge a complaint directly with any
local
Supervisory Authority about how we process your personal data.
The right to withdraw consent. If you have given
your
consent to anything we do with your personal data (i.e., we rely on
consent as a legal basis for processing your personal data), you
have
the right to withdraw your consent at any time (although if you do
so,
it does not mean that anything we have done with your personal data
with
your consent up to that point is unlawful). You can withdraw your
consent to the processing of your personal data at any time by
contacting us with the details provided below.
Rights related to automated decision-making. You
have
the right not to be subject to a decision which is based solely on
automated processing and which produces legal or other significant
effects on you. In particular, you have the right:
to obtain human intervention;
to express your point of view;
to obtain an explanation of the decision
reached after an assessment; and
to challenge such a decision.
Further information and advice about your rights can be obtained from the
data protection Regulator in your Country.
We are committed to protect your personal information collected and
processed
by us and look forward to your continued support for the same. If you
have
any query, grievance with respect to the processing of information by
us,
you can reach out to us by calling our Toll Free No.
1800-10-22-221
or by email to lever.care@unilever.com or
submitting a request through the “Contact Us
(Privacy Request/Concern)”
form available on the HUL website.
You can also reach out to our Privacy Office in the event of any
escalation
or absence of resolution of grievance, requests, rights pertaining to
personal data processed by us. You may contact our DPO/Privacy Grievance
Officer at (1) The Data Protection Officer/Privacy Grievance Officer,
Hindustan Unilever Limited, Unilever House, B. D. Sawant Marg, Chakala,
Andheri (E), Mumbai - 400 099 or at: Grievance.Officer-Privacy@unilever.com.
You can also call on the aforementioned contact number and request it to
be
referred to the DPO/Data Protection Office.
When a privacy question or access request is received, we have
a dedicated
team which triages the contacts and seeks to address the specific
concern or
query which you are seeking to raise. Where your issue may be more
substantive in nature, more information may be sought from you. If you
are
unsatisfied with the reply received, you may refer your complaint to the
relevant Supervisory Authority. If you ask us, we will endeavour to
provide
you with information about relevant complaint avenues which may be
applicable to your circumstances.
We will update this Privacy Notice when necessary to
reflect
customer feedback and changes in our products and services. When we post
changes to this statement, we will revise the “last
updated” date at the top of this Notice. If the changes are
significant, we will provide a more prominent notice
(including, for certain services, email notification of Privacy Notice
changes). We will also keep prior versions of this Privacy Notice in an
archive for your review.
We will not reduce your rights under this Privacy Notice
without your consent.
Additional Privacy Terms or Notices
In addition to this Privacy Notice, there may be specific campaigns or
promotions which will be governed by additional privacy
terms or notices. We encourage you to read
these additional terms or notices before participating in any such
campaigns
or promotions as you will be required to comply with them if you
participate. Any additional privacy terms or notices will be made
prominently available to you.


 Privacy Notice